Auto-posting from WordPress to X (formerly Twitter). To achieve this, many people rely on plugins.
However, if you run a media site for a long time, you inevitably face these problems:
- “The plugin suddenly stopped working.”
- “Posts are failing due to API limits, but I don’t know why.”
- “An update wiped out my settings.”
Plugins meant to make life easier often become the biggest source of instability.
Recently, I encountered a situation where “WordPress POST hooks stopped working.” So, I decided to stop relying on existing plugins and built a “bulletproof distribution infrastructure” using Google Apps Script (GAS) and X API v2.
I am convinced this is the ultimate configuration for individual media operators.
Design Philosophy: WordPress Should Only “Notify”
The core concept of this tool is “Don’t let WordPress do unnecessary work.”
Traditional Plugin Architecture
- WordPress holds the “X Authentication Credentials”.
- WordPress handles the “Posting Process to X”.
- WordPress handles “Error Handling”.
This makes WP heavy and insecure (if WP is compromised, your X account is too).
My “Ultimate Configuration”
- WordPress: Just throws a JSON to GAS when an article is published.
- GAS: Handles authentication, posting, logging, and retries.
- Spreadsheet: Records and visualizes posting logs.
[WordPress]
    ↓ (POST: Title, URL)
[Google Apps Script] ← Secret keys are isolated here
    ↓ (OAuth 1.0a)
[X API v2]
    ↓
[Spreadsheet] (Log: Success/Fail)
With this setup, even if WordPress is compromised, your X account remains safe. Also, if X changes its API specs, you only need to fix the GAS side.
Tech Stack
- WordPress: A few lines of hooks in
functions.php - Google Apps Script: Signing and POSTing to X API v2 (No libraries used)
- X API: v2 API (
/2/tweets) usable even on the Free plan - Authentication: OAuth 1.0a (Generating signatures within GAS)
Implementation Guide: Step-by-Step
Here is the step-by-step guide to building this tool. Even if you are not familiar with programming, you can complete it by following these instructions.
Step 1: Create a Spreadsheet for Logs
First, create a new Google Spreadsheet in your Google Drive. Enter the following headers in the first row:
- Column A:
time - Column B:
post_id - Column C:
text - Column D:
tweet_id - Column E:
status - Column F:
error
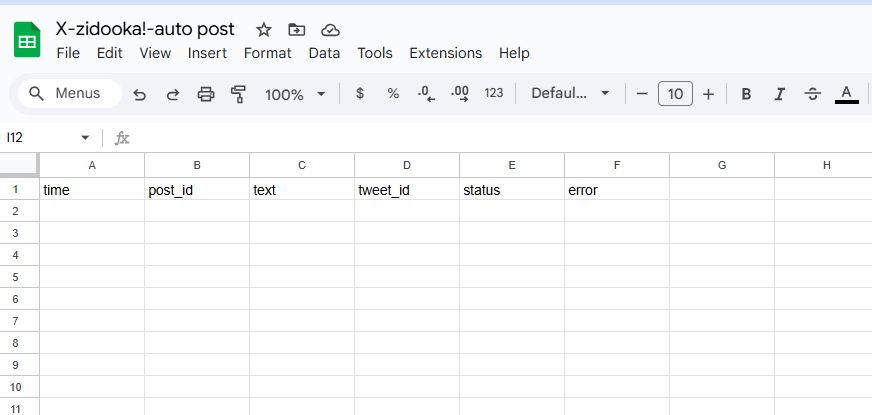
Note down the ID part of this spreadsheet’s URL (the string between /d/ and /edit), as you will need it later.
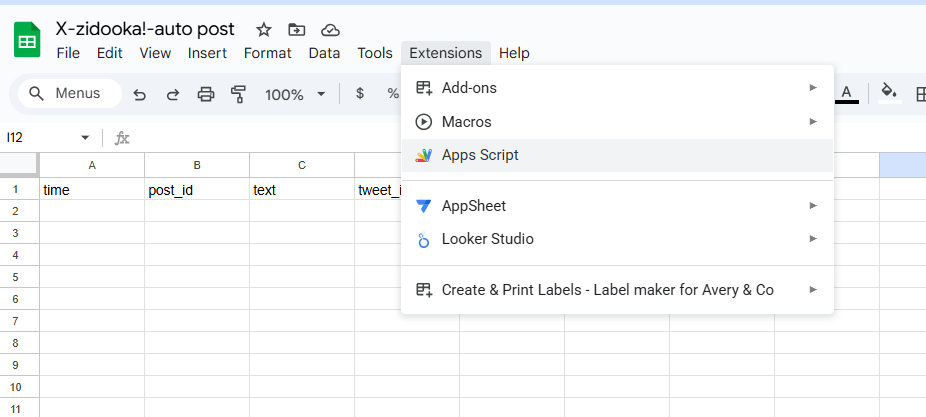
Step 2: Open GAS Project
From the spreadsheet menu, click “Extensions” -> “Apps Script”. This opens the GAS editor linked to this sheet.
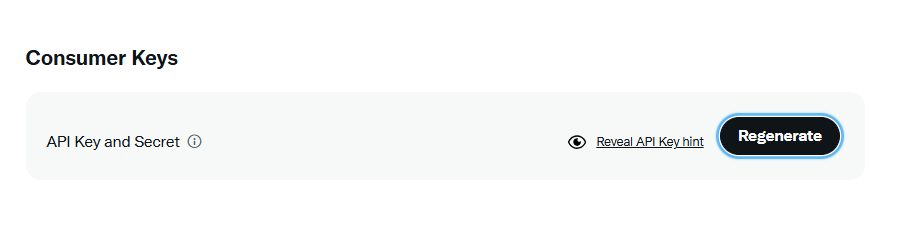
Step 3: Get Keys from X Developer Portal
Access the X Developer Portal and create a project (Free plan is fine). From the “Keys and tokens” tab, get the following 4 pieces of information:
- API Key (Consumer Key)
- API Key Secret (Consumer Secret)
- Access Token
- Access Token Secret
Note: When generating the Access Token, make sure to grant “Read and Write” permissions.
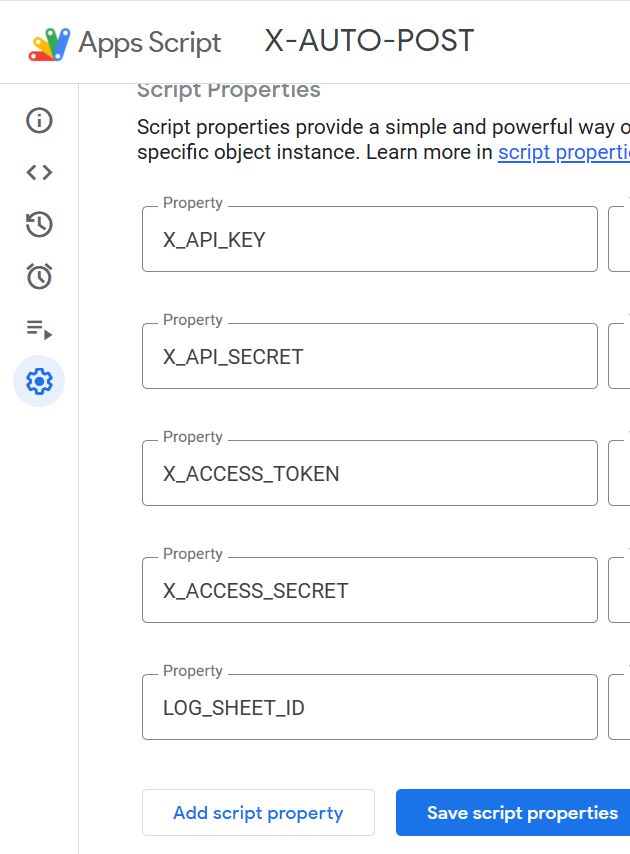
Step 4: Set Script Properties
Return to the GAS editor and click the gear icon (Project Settings) on the left. In the “Script Properties” section at the bottom, set the keys you just obtained and the Sheet ID from Step 1.
| Property | Value |
|---|---|
X_API_KEY |
(Your API Key) |
X_API_SECRET |
(Your API Key Secret) |
X_ACCESS_TOKEN |
(Your Access Token) |
X_ACCESS_SECRET |
(Your Access Token Secret) |
LOG_SHEET_ID |
(Your Spreadsheet ID) |
Step 5: Paste the Code
Go back to the “Editor (<> icon)” on the left and replace the entire content of Code.gs with the following code.
No external libraries are required.
/**
* WordPress → GAS Web App 入口
*/
function doPost(e) {
try {
if (!e || !e.postData || !e.postData.contents) {
throw new Error('No postData');
}
const data = JSON.parse(e.postData.contents);
if (!data.text) {
throw new Error('No text');
}
const tweetId = postToX(data.text);
logPost({
post_id: data.post_id || '',
text: data.text,
tweet_id: tweetId,
status: 'success',
error: ''
});
return json({ ok: true, tweet_id: tweetId });
} catch (err) {
logPost({
post_id: '',
text: '',
tweet_id: '',
status: 'error',
error: err.toString()
});
return json({ ok: false, error: err.toString() });
}
}
/**
* X(Twitter)へ投稿
*/
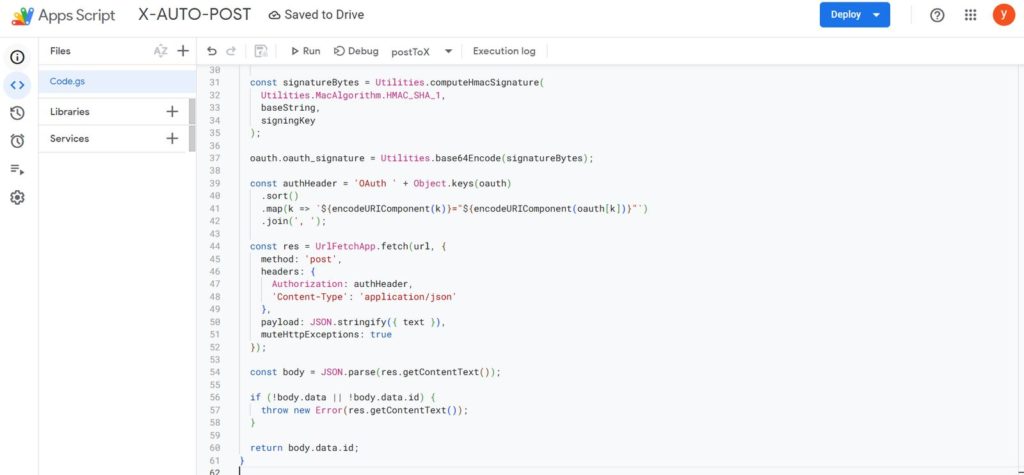
function postToX(text) {
const props = PropertiesService.getScriptProperties();
const url = 'https://api.twitter.com/2/tweets';
const method = 'POST';
const oauth = {
oauth_consumer_key: props.getProperty('X_API_KEY'),
oauth_token: props.getProperty('X_ACCESS_TOKEN'),
oauth_nonce: Utilities.getUuid(),
oauth_timestamp: Math.floor(Date.now() / 1000),
oauth_signature_method: 'HMAC-SHA1',
oauth_version: '1.0'
};
const baseString =
method + '&' +
encodeURIComponent(url) + '&' +
encodeURIComponent(
Object.keys(oauth)
.sort()
.map(k => `${encodeURIComponent(k)}=${encodeURIComponent(oauth[k])}`)
.join('&')
);
const signingKey =
encodeURIComponent(props.getProperty('X_API_SECRET')) + '&' +
encodeURIComponent(props.getProperty('X_ACCESS_SECRET'));
const signatureBytes = Utilities.computeHmacSignature(
Utilities.MacAlgorithm.HMAC_SHA_1,
baseString,
signingKey
);
oauth.oauth_signature = Utilities.base64Encode(signatureBytes);
const authHeader = 'OAuth ' + Object.keys(oauth)
.sort()
.map(k => `${encodeURIComponent(k)}="${encodeURIComponent(oauth[k])}"`)
.join(', ');
const res = UrlFetchApp.fetch(url, {
method: 'post',
headers: {
Authorization: authHeader,
'Content-Type': 'application/json'
},
payload: JSON.stringify({ text }),
muteHttpExceptions: true
});
const body = JSON.parse(res.getContentText());
if (!body.data || !body.data.id) {
throw new Error(res.getContentText());
}
return body.data.id;
}
/**
* スプレッドシートにログ
*/
function logPost(row) {
const sheetId = PropertiesService
.getScriptProperties()
.getProperty('LOG_SHEET_ID');
if (!sheetId) return;
const sheet = SpreadsheetApp
.openById(sheetId)
.getSheets()[0];
sheet.appendRow([
new Date(),
row.post_id,
row.text,
row.tweet_id,
row.status,
row.error
]);
}
/**
* JSONレスポンス
*/
function json(obj) {
return ContentService
.createTextOutput(JSON.stringify(obj))
.setMimeType(ContentService.MimeType.JSON);
}
/**
* 単体テスト用
*/
function testPost() {
postToX('GASからのテスト投稿です');
}
Step 6: Deploy as Web App
Click “Deploy” -> “New deployment” in the top right.
- Select type: Click the gear icon and select “Web app”.
- Description: Enter anything (e.g.,
v1). - Execute as:
Me. - Who has access:
Anyone← Important!
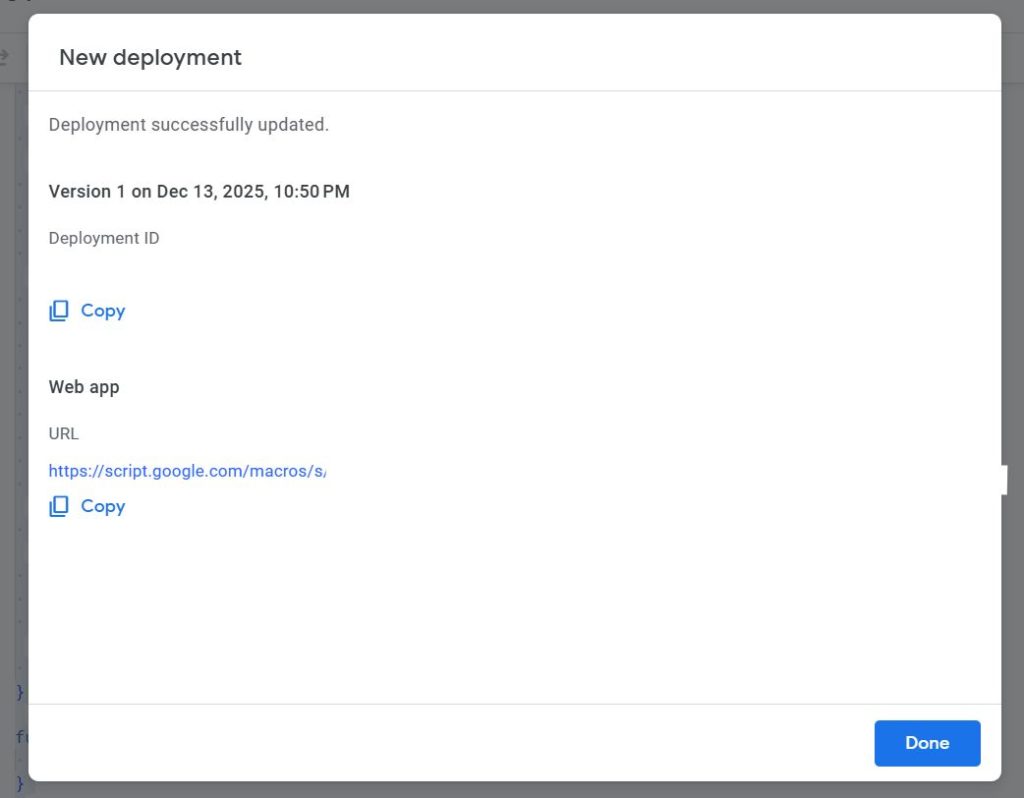
Click “Deploy” to generate a URL (Web App URL). Copy this URL (you will use it in the WordPress settings).
Implementation Step 2: WordPress Side
On the WordPress side, just add the following code to functions.php.
It hooks only when an article is “published” and sends data to GAS.
/**
 * WordPress → GAS → X Auto Post
 */
add_action('transition_post_status', function ($new_status, $old_status, $post) {

  // Run only when status becomes 'publish'
  if ($old_status === 'publish' || $new_status !== 'publish') return;

  // Limit to 'post' type
  if ($post->post_type !== 'post') return;

  // Exclude autosaves and revisions
  if (wp_is_post_autosave($post->ID) || wp_is_post_revision($post->ID)) return;

  // Prevent double posting (managed by meta data)
  if (get_post_meta($post->ID, '_x_posted', true)) return;

  // Get title and URL
  $title = trim(wp_strip_all_tags($post->post_title));
  if ($title === '') return;

  $title = mb_substr($title, 0, 100); // Limit length
  $url   = get_permalink($post->ID);

  // Create post text
  $text = "【New Post】\n{$title}\n\n{$url}";

  // GAS Web App URL (Issued earlier)
  $gas_url = 'https://script.google.com/macros/s/YOUR_GAS_ID/exec';

  // POST to GAS
  $response = wp_remote_post(
    $gas_url,
    [
      'timeout' => 5,
      'headers' => ['Content-Type' => 'application/json'],
      'body' => wp_json_encode([
        'post_id' => $post->ID,
        'text'    => $text
      ])
    ]
  );

  // Save flag on success
  if (!is_wp_error($response)) {
    update_post_meta($post->ID, '_x_posted', 1);
  }

}, 10, 3);
Caution: The functions.php Trap
During implementation, I accidentally wrote <?php twice in the middle of functions.php, causing the hook to fail silently.
functions.php only needs <?php at the very beginning of the file. Writing it in the middle can cause syntax errors, so be careful.
Benefits Realized in Operation
I’ve started using this setup, and the stability is on another level.
- Failures are Visible: All logs are kept in the Spreadsheet, so it’s obvious “when” and “why” something failed.
- Easy Retry: Even if it fails, you can retry just by hitting the GAS endpoint again.
- High Extensibility: Extensions like “changing hashtags by category” or “posting to Bluesky simultaneously” can be done entirely within GAS.
Summary
“Installing a plugin” is easy, but it also means “holding a black box”. If you plan to run a media site for the long term, building a configuration that “you can fix yourself when it breaks” is the shortest path to success.
This “WordPress × GAS × X API” configuration should be the ultimate weapon for individual developers and bloggers. Please give it a try.